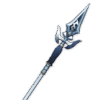
Genshin character full wish - Thoma

Genshin Impact Thoma Best build, materials, teams & more

Pyro

Element

Pyro
4 star

Rarity

4 star character
Polearm

Type

Polearm
B Tier

Tier

B tier
Genshin character icon - Thoma

Thoma (Protector From Afar)

Thoma is a Pyro polearm character who supports the team with shields and consistent Pyro application. His Elemental Skill creates a shield that scales with his max HP. His Burst deals AoE Pyro damage and applies Pyro with follow-up attacks, making him a solid choice for reaction-based teams. Thoma fits best in teams that need defensive support and steady Pyro application from off-field.

Team role: Support, Sub-DPS
Birthday: January 9th
Constellation: Rubeum Scutum
Released in: 2.2

Weapon Icon Best Weapons

Best Support Weapons

3 Star
  1. #01
    Genshin weapon - Favonius Lance R5

    Favonius Lance

    Genshin weapon - Favonius Lance

    Favonius Lance

    ATK   -   565
    Energy Recharge   -   30.6%

    CRIT Hits have a 60% (70%, 80%, 90%, 100%) chance to generate a small amount of Elemental Particles, which will regenerate 6 Energy for the character. Can only occur once every 12% (10.5%, 9%, 7.5%, 6%)s.

  2. #02
    Genshin weapon - Engulfing Lightning R1

    Engulfing Lightning

    Genshin weapon - Engulfing Lightning

    Engulfing Lightning

    ATK   -   608
    Energy Recharge   -   55.1%

    ATK increased by 28% (35%, 42%, 49%, 56%) of Energy Recharge over the base 100%. You can gain a maximum bonus of 80% (90%, 100%, 110%, 120%) ATK. Gain 30% (35%, 40%, 45%, 50%) Energy Recharge for 12s after using an Elemental Burst.

  3. #03
    Genshin weapon - R5

    The Catch

    Genshin weapon -

    The Catch

    ATK   -   510
    Energy Recharge   -   45.9%

    Increases Elemental Burst DMG by 16% (20%, 24%, 28%, 32%) and Elemental Burst CRIT Rate by 6% (7.5%, 9%, 10.5%, 12%).

  4. #04
    Genshin weapon - Kitain Cross Spear R5

    Kitain Cross Spear

    Genshin weapon - Kitain Cross Spear

    Kitain Cross Spear

    ATK   -   565
    Elemental Mastery   -   110

    Increases Elemental Skill DMG by 6% (7.5%, 9%, 10.5%, 12%). After Elemental Skill hits an opponent, the character loses 3% (3.5%, 4%, 4.5%, 5%) Energy but regenerates 3 Energy every 2s for the next 6s. This effect can occur once every 10s. Can be triggered even when the character is not on the field.

  5. #05
    Genshin weapon - Rightful Reward R5

    Rightful Reward

    Genshin weapon - Rightful Reward

    Rightful Reward

    ATK   -   565
    HP   -   27.6%

    When the wielder is healed, restore 8% (10%, 12%, 14%, 16%) Energy. This effect can be triggered once every 10s, and can occur even when the character is not on the field.
  6. #06
    Genshin weapon - Prototype Starglitter R5

    Prototype Starglitter

    Genshin weapon - Prototype Starglitter

    Prototype Starglitter

    ATK   -   510
    Energy Recharge   -   45.9%

    After using an Elemental Skill, increases Normal and Charged Attack DMG by 8% (10%, 12%, 14%, 16%) for 12s. Max 2 stacks.
  7. #07
    Genshin weapon - Black Tassel R5

    Black Tassel

    Genshin weapon - Black Tassel

    Black Tassel

    ATK   -   354
    HP   -   46.9%

    Increases DMG against slimes by 40% (50%, 60%, 70%, 80%).
    Useless passive effect, but great HP% main stat.

Best Sub DPS Weapons

3 Star
  1. #01
    Genshin weapon - Lumidouce Elegy R1

    Lumidouce Elegy

    Genshin weapon - Lumidouce Elegy

    Lumidouce Elegy

    ATK   -   608
    CRIT Rate   -   33.1%

    ATK increased by 15% (19%, 23%, 27%, 31%). After the equipping character triggers Burning on an opponent or deals Dendro DMG to Burning opponents, the DMG dealt is increased by 18% (23%, 28%, 33%, 38%). This effect lasts for 8s, max 2 stacks. When 2 stacks are reached or when the duration is refreshed at 2 stacks, restore 12% (13%, 14%, 15%, 16%) Energy. Energy can be restored this way once every 12s. The 2 aforementioned effects can be triggered even when the character is off-field.

  2. #02
    Genshin weapon - Staff of the Scarlet Sands R1

    Staff of the Scarlet Sands

    Genshin weapon - Staff of the Scarlet Sands

    Staff of the Scarlet Sands

    ATK   -   542
    CRIT Rate   -   44.1%

    The equipping character gains 52% (65%, 78%, 91%, 104%) of their Elemental Mastery as bonus ATK. When an Elemental Skill hits opponents, the Dream of the Scarlet Sands effect will be gained for 10s: The equipping character will gain 28% (35%, 42%, 49%, 56%) of their Elemental Mastery as bonus ATK. Max 3 stacks.

  3. #03
    Genshin weapon - Calamity Queller R1

    Calamity Queller

    Genshin weapon - Calamity Queller

    Calamity Queller

    ATK   -   741
    ATK   -   16.5%

    Gain 12% (15%, 18%, 21%, 24%) All Elemental DMG Bonus. Obtain Consummation for 20s after using an Elemental Skill, causing ATK to increase by 3.2% (4%, 4.8%, 5.6%, 6.4%) per second. This ATK increase has a maximum of 6 stacks. When the character equipped with this weapon is not on the field, Consummation’s ATK increase is doubled.

  4. #04
    Genshin weapon - Dragon's Bane R5

    Dragon’s Bane

    Genshin weapon - Dragon's Bane

    Dragon’s Bane

    ATK   -   454
    Elemental Mastery   -   221

    Increases DMG against opponents affected by Hydro or Pyro by 20% (24%, 28%, 32%, 36%).

  5. #05
    Genshin weapon - Moonpiercer R5

    Moonpiercer

    Genshin weapon - Moonpiercer

    Moonpiercer

    ATK   -   565
    Elemental Mastery   -   110

    After triggering Burning, Quicken, Aggravate, Spread, Bloom, Hyperbloom, or Burgeon, a Leaf of Revival will be created around the character for a maximum of 10s. When picked up, the Leaf will grant the character 16% (20%, 24%, 28%, 32%) ATK for 12s. Only 1 Leaf can be generated this way every 20s. This effect can still be triggered if the character is not on the field.
  6. #06
    Genshin weapon - Ballad of the Fjords R5

    Ballad of the Fjords

    Genshin weapon - Ballad of the Fjords

    Ballad of the Fjords

    ATK   -   510
    CRIT Rate   -   27.6%

    When there are at least 3 different Elemental Types in your party, Elemental Mastery will be increased by 120% (150%, 180%, 210%, 240%).

  7. #07
    Genshin weapon - Favonius Lance R5

    Favonius Lance

    Genshin weapon - Favonius Lance

    Favonius Lance

    ATK   -   565
    Energy Recharge   -   30.6%

    CRIT Hits have a 60% (70%, 80%, 90%, 100%) chance to generate a small amount of Elemental Particles, which will regenerate 6 Energy for the character. Can only occur once every 12% (10.5%, 9%, 7.5%, 6%)s.

  8. #08
    Genshin weapon - R5

    The Catch

    Genshin weapon -

    The Catch

    ATK   -   510
    Energy Recharge   -   45.9%

    Increases Elemental Burst DMG by 16% (20%, 24%, 28%, 32%) and Elemental Burst CRIT Rate by 6% (7.5%, 9%, 10.5%, 12%).

  9. #09
    Genshin weapon - Missive Windspear R5

    Missive Windspear

    Genshin weapon - Missive Windspear

    Missive Windspear

    ATK   -   510
    ATK   -   41.3%

    Within 10s after an Elemental Reaction is triggered, ATK is increased by 12% (15%, 18%, 21%, 24%) and Elemental Mastery is increased by 48% (60%, 72%, 84%, 96%).

Artifact Icon Best Artifacts

Best Support Artifacts

  1. #01
    Genshin artifact Royal Flora 4x
    Noblesse Oblige
    Genshin artifact Royal Flora

    Noblesse Oblige

    Artifact set

    2-piece Bonus
    Elemental Burst DMG +20%

    4-piece Bonus
    Using an Elemental Burst increases all party members’ ATK by 20% for 12s. This effect cannot stack.

    For boosting your teammates' ATK. Make sure you don't have another character in your team with this set, as the buffs do not stack.
  2. #02
    Genshin artifact Flower of Accolades 4x
    Tenacity of the Millelith
    Genshin artifact Flower of Accolades

    Tenacity of the Millelith

    Artifact set

    2-piece Bonus
    HP +20%

    4-piece Bonus
    When an Elemental Skill hits an opponent, the ATK of all nearby party members is increased by 20% and their Shield Strength is increased by 30% for 3s. This effect can be triggered once every 0.5s. This effect can still be triggered even when the character who is using this artifact set is not on the field.

    Overall good option for a lasting shield and some additional ATK buff.
  3. #03
    Genshin artifact Instructor's Brooch 4x
    In­struc­tor
    Genshin artifact Instructor's Brooch

    In­struc­tor

    Artifact set

    2-piece Bonus
    Increases Elemental Mastery by 80.

    4-piece Bonus
    Upon triggering an Elemental Reaction, increases all party members’ Elemental Mastery by 120 for 8s.

Best artifacts main stats

  • Circlet HP%
  • Sands Energy Recharge
  • Goblet HP%

Sub stats priority

  1. HP%
  2. Energy Recharge
  3. Elemental Mastery
ER requirements:    200% – 250%
Energy Recharge shown is an estimate for a comfotable gameplay. Actual ER requirements can vary depending on your team, weapons, artifacts etc. You can calculate the exact ER you need by using the Genshin ER Calculator spreadsheet .

Best Sub DPS Artifacts

  1. #01
    Genshin artifact Ay-Khanoum's Myriad 4x
    Flower of Paradise Lost
    Genshin artifact Ay-Khanoum's Myriad

    Flower of Paradise Lost

    Artifact set

    2-piece Bonus
    Increases Elemental Mastery by 80.

    4-piece Bonus
    The equipping character’s Bloom, Hyperbloom, and Burgeon reaction DMG are increased by 40%, and their Lunar-Bloom reaction DMG is increased by 10%. Additionally, after the equipping character triggers Bloom, Hyperbloom, Lunar-Bloom, or Burgeon, they will gain another 25% bonus to the effect mentioned prior. Each stack of this lasts 10s. Max 4 stacks simultaneously. This effect can only be triggered once per second. The character who equips this can still trigger its effects when not on the field.

    Only recommended for Burgeon teams.
  2. #02
    Genshin artifact Magnificent Tsuba 4x
    Emblem of Severed Fate
    Genshin artifact Magnificent Tsuba

    Emblem of Severed Fate

    Artifact set

    2-piece Bonus
    Energy Recharge +20%

    4-piece Bonus
    Increases Elemental Burst DMG by 25% of Energy Recharge. A maximum of 75% bonus DMG can be obtained in this way.

    Good general option.
  3. #03
    Genshin artifact Witch's Flower of Blaze 4x
    Crimson Witch of Flames
    Genshin artifact Witch's Flower of Blaze

    Crimson Witch of Flames

    Artifact set

    2-piece Bonus
    Pyro DMG Bonus +15%

    4-piece Bonus
    Increases Overloaded and Burning, and Burgeon DMG by 40%. Increases Vaporize and Melt DMG by 15%. Using Elemental Skill increases the 2-Piece Set Bonus by 50% of its starting value for 10s. Max 3 stacks.

Best artifacts main stats

  • Circlet Elemental Mastery
  • Sands Energy Recharge
  • Goblet Elemental Mastery

Sub stats priority

  1. Elemental Mastery
  2. Energy Recharge
  3. HP%, HP
ER requirements:    200% – 250%
Energy Recharge shown is an estimate for a comfotable gameplay. Actual ER requirements can vary depending on your team, weapons, artifacts etc. You can calculate the exact ER you need by using the Genshin ER Calculator spreadsheet .

Teams Icon Best Teams

Thoma’s best teams as a Sub DPS are usually Burgeon teams. There are many different combinations, but in every team, you need 1 hydro and 1 dendro unit, then Thoma, while the last slot is flexible. You can flex another Dendro/Hydro character, or you can even slot in an Electro/Anemo/Cryo character. Here are some popular examples of Burgeon teams:

Materials Icon Materials

  • Gemstone
    Agnidus Agate Gemstone
    Agnidus Agate Gemstone
    Agnidus Agate Gemstone

    Agnidus Agate Gemstone

    Character Ascension Materials

    How to obtain?

    • Dropped by Normal Bosses and Weekly Bosses (Lv. 75+)
    • Alchemy (AR 45+)
    Visit wiki for more info
  • Local Specialty
    Fluorescent Fungus
    Fluorescent Fungus
    Fluorescent Fungus

    Fluorescent Fungus

    Local Specialty (Inazuma)

    How to obtain?

    • Found in the wild on Tsurumi Island
    Visit wiki for more info
  • Enemy drop
    Golden Raven Insignia
    Golden Raven Insignia
    Golden Raven Insignia

    Golden Raven Insignia

    Character and Weapon Enhancement Materials

    How to obtain?

    • Dropped by Lv. 60+ Treasure Hoarders
    • Alchemy
    Visit wiki for more info
  • Boss drop
    Smoldering Pearl
    Smoldering Pearl
    Smoldering Pearl

    Smoldering Pearl

    Character Level-Up Materials

    How to obtain?

    • Dropped by Lv.30+ Pyro Hypostases
    Visit wiki for more info
  • Talent level up
    Guide to Transience
    Guide to Transience
    Guide to Transience

    Guide to Transience

    Character Talent Materials

    How to obtain?

    • Violet Court(Monday/Thursday/Sunday)
    • Crafting
    • Parametric Transformer
    Visit wiki for more info
  • Weekly boss drop
    Hellfire Butterfly
    Hellfire Butterfly
    Hellfire Butterfly

    Hellfire Butterfly

    Character Level-Up Materials

    How to obtain?

    • Lv. 70+ Narukami Island: Tenshukaku Reward
    Visit wiki for more info

Phase Req. Lvl Mora Gemstone Specialty Enemy Drop Boss Drop
1 20 20,000
Agnidus Agate Sliver 1x
Agnidus Agate Sliver

Agnidus Agate Sliver

Character Ascension Materials

How to obtain?

  • Dropped by Normal Bosses and Weekly Bosses
  • Alchemy
  • Sold by Marjorie and Xingxi
  • Commission Bonus Rewards
  • Parametric Transformer
Visit wiki for more info
Fluorescent Fungus 3x
Fluorescent Fungus
Fluorescent Fungus

Fluorescent Fungus

Local Specialty (Inazuma)

How to obtain?

  • Found in the wild on Tsurumi Island
Visit wiki for more info
Treasure Hoarder Insignia 3x
Treasure Hoarder Insignia

Treasure Hoarder Insignia

Character and Weapon Enhancement Materials

How to obtain?

  • Dropped by Treasure Hoarders
  • Purchased from Paimon's Bargains
Visit wiki for more info
-
2 40 40,000
Agnidus Agate Fragment 3x
Agnidus Agate Fragment

Agnidus Agate Fragment

Character Ascension Materials

How to obtain?

  • Dropped by Normal Bosses and Weekly Bosses (Lv. 40+)
  • Alchemy (AR 25+)
  • Parametric Transformer
Visit wiki for more info
Fluorescent Fungus 10x
Fluorescent Fungus
Fluorescent Fungus

Fluorescent Fungus

Local Specialty (Inazuma)

How to obtain?

  • Found in the wild on Tsurumi Island
Visit wiki for more info
Treasure Hoarder Insignia 15x
Treasure Hoarder Insignia

Treasure Hoarder Insignia

Character and Weapon Enhancement Materials

How to obtain?

  • Dropped by Treasure Hoarders
  • Purchased from Paimon's Bargains
Visit wiki for more info
Smoldering Pearl 2x
Smoldering Pearl
Smoldering Pearl

Smoldering Pearl

Character Level-Up Materials

How to obtain?

  • Dropped by Lv.30+ Pyro Hypostases
Visit wiki for more info
3 50 60,000
Agnidus Agate Fragment 6x
Agnidus Agate Fragment

Agnidus Agate Fragment

Character Ascension Materials

How to obtain?

  • Dropped by Normal Bosses and Weekly Bosses (Lv. 40+)
  • Alchemy (AR 25+)
  • Parametric Transformer
Visit wiki for more info
Fluorescent Fungus 20x
Fluorescent Fungus
Fluorescent Fungus

Fluorescent Fungus

Local Specialty (Inazuma)

How to obtain?

  • Found in the wild on Tsurumi Island
Visit wiki for more info
Silver Raven Insignia 12x
Silver Raven Insignia

Silver Raven Insignia

Character and Weapon Enhancement Materials

How to obtain?

  • Dropped by Lv. 40+ Treasure Hoarders
  • Alchemy
  • Purchased from Paimon's Bargains
Visit wiki for more info
Smoldering Pearl 4x
Smoldering Pearl
Smoldering Pearl

Smoldering Pearl

Character Level-Up Materials

How to obtain?

  • Dropped by Lv.30+ Pyro Hypostases
Visit wiki for more info
4 60 80,000
Agnidus Agate Chunk 3x
Agnidus Agate Chunk
Agnidus Agate Chunk

Agnidus Agate Chunk

Character Ascension Materials

How to obtain?

  • Dropped by Normal Bosses and Weekly Bosses (Lv.60+)
  • Alchemy (AR 35+)
Visit wiki for more info
Fluorescent Fungus 30x
Fluorescent Fungus
Fluorescent Fungus

Fluorescent Fungus

Local Specialty (Inazuma)

How to obtain?

  • Found in the wild on Tsurumi Island
Visit wiki for more info
Silver Raven Insignia 18x
Silver Raven Insignia

Silver Raven Insignia

Character and Weapon Enhancement Materials

How to obtain?

  • Dropped by Lv. 40+ Treasure Hoarders
  • Alchemy
  • Purchased from Paimon's Bargains
Visit wiki for more info
Smoldering Pearl 8x
Smoldering Pearl
Smoldering Pearl

Smoldering Pearl

Character Level-Up Materials

How to obtain?

  • Dropped by Lv.30+ Pyro Hypostases
Visit wiki for more info
5 70 100,000
Agnidus Agate Chunk 6x
Agnidus Agate Chunk
Agnidus Agate Chunk

Agnidus Agate Chunk

Character Ascension Materials

How to obtain?

  • Dropped by Normal Bosses and Weekly Bosses (Lv.60+)
  • Alchemy (AR 35+)
Visit wiki for more info
Fluorescent Fungus 45x
Fluorescent Fungus
Fluorescent Fungus

Fluorescent Fungus

Local Specialty (Inazuma)

How to obtain?

  • Found in the wild on Tsurumi Island
Visit wiki for more info
Golden Raven Insignia 12x
Golden Raven Insignia

Golden Raven Insignia

Character and Weapon Enhancement Materials

How to obtain?

  • Dropped by Lv. 60+ Treasure Hoarders
  • Alchemy
Visit wiki for more info
Smoldering Pearl 12x
Smoldering Pearl
Smoldering Pearl

Smoldering Pearl

Character Level-Up Materials

How to obtain?

  • Dropped by Lv.30+ Pyro Hypostases
Visit wiki for more info
6 80 120,000
Agnidus Agate Gemstone 6x
Agnidus Agate Gemstone

Agnidus Agate Gemstone

Character Ascension Materials

How to obtain?

  • Dropped by Normal Bosses and Weekly Bosses (Lv. 75+)
  • Alchemy (AR 45+)
Visit wiki for more info
Fluorescent Fungus 60x
Fluorescent Fungus
Fluorescent Fungus

Fluorescent Fungus

Local Specialty (Inazuma)

How to obtain?

  • Found in the wild on Tsurumi Island
Visit wiki for more info
Golden Raven Insignia 24x
Golden Raven Insignia

Golden Raven Insignia

Character and Weapon Enhancement Materials

How to obtain?

  • Dropped by Lv. 60+ Treasure Hoarders
  • Alchemy
Visit wiki for more info
Smoldering Pearl 20x
Smoldering Pearl
Smoldering Pearl

Smoldering Pearl

Character Level-Up Materials

How to obtain?

  • Dropped by Lv.30+ Pyro Hypostases
Visit wiki for more info

Level Mora Talent Book Common Drop Weekly Boss Drop Crown of Insight
1 → 2 12,500
Teachings of Transience 3x
Teachings of Transience

Teachings of Transience

Character Talent Materials

How to obtain?

  • Violet Court(Monday/Thursday/Sunday)
  • Parametric Transformer
  • Chests
Visit wiki for more info
Treasure Hoarder Insignia 6x
Treasure Hoarder Insignia

Treasure Hoarder Insignia

Character and Weapon Enhancement Materials

How to obtain?

  • Dropped by Treasure Hoarders
  • Purchased from Paimon's Bargains
Visit wiki for more info
- -
2 → 3 17,500
Guide to Transience 2x
Guide to Transience
Guide to Transience

Guide to Transience

Character Talent Materials

How to obtain?

  • Violet Court(Monday/Thursday/Sunday)
  • Crafting
  • Parametric Transformer
Visit wiki for more info
Silver Raven Insignia 3x
Silver Raven Insignia

Silver Raven Insignia

Character and Weapon Enhancement Materials

How to obtain?

  • Dropped by Lv. 40+ Treasure Hoarders
  • Alchemy
  • Purchased from Paimon's Bargains
Visit wiki for more info
- -
3 → 4 25,000
Guide to Transience 4x
Guide to Transience
Guide to Transience

Guide to Transience

Character Talent Materials

How to obtain?

  • Violet Court(Monday/Thursday/Sunday)
  • Crafting
  • Parametric Transformer
Visit wiki for more info
Silver Raven Insignia 4x
Silver Raven Insignia

Silver Raven Insignia

Character and Weapon Enhancement Materials

How to obtain?

  • Dropped by Lv. 40+ Treasure Hoarders
  • Alchemy
  • Purchased from Paimon's Bargains
Visit wiki for more info
- -
4 → 5 30,000
Guide to Transience 6x
Guide to Transience
Guide to Transience

Guide to Transience

Character Talent Materials

How to obtain?

  • Violet Court(Monday/Thursday/Sunday)
  • Crafting
  • Parametric Transformer
Visit wiki for more info
Silver Raven Insignia 6x
Silver Raven Insignia

Silver Raven Insignia

Character and Weapon Enhancement Materials

How to obtain?

  • Dropped by Lv. 40+ Treasure Hoarders
  • Alchemy
  • Purchased from Paimon's Bargains
Visit wiki for more info
- -
5 → 6 37,500
Guide to Transience 9x
Guide to Transience
Guide to Transience

Guide to Transience

Character Talent Materials

How to obtain?

  • Violet Court(Monday/Thursday/Sunday)
  • Crafting
  • Parametric Transformer
Visit wiki for more info
Silver Raven Insignia 9x
Silver Raven Insignia

Silver Raven Insignia

Character and Weapon Enhancement Materials

How to obtain?

  • Dropped by Lv. 40+ Treasure Hoarders
  • Alchemy
  • Purchased from Paimon's Bargains
Visit wiki for more info
- -
6 → 7 120,000
Philosophies of Transience 4x
Philosophies of Transience

Philosophies of Transience

Character Talent Materials

How to obtain?

  • Violet Court(Monday/Thursday/Sunday)
  • Crafting
Visit wiki for more info
Golden Raven Insignia 4x
Golden Raven Insignia

Golden Raven Insignia

Character and Weapon Enhancement Materials

How to obtain?

  • Dropped by Lv. 60+ Treasure Hoarders
  • Alchemy
Visit wiki for more info
Smoldering Pearl 1x
Smoldering Pearl
Smoldering Pearl

Smoldering Pearl

Character Level-Up Materials

How to obtain?

  • Dropped by Lv.30+ Pyro Hypostases
Visit wiki for more info
-
7 → 8 260,000
Philosophies of Transience 6x
Philosophies of Transience

Philosophies of Transience

Character Talent Materials

How to obtain?

  • Violet Court(Monday/Thursday/Sunday)
  • Crafting
Visit wiki for more info
Golden Raven Insignia 6x
Golden Raven Insignia

Golden Raven Insignia

Character and Weapon Enhancement Materials

How to obtain?

  • Dropped by Lv. 60+ Treasure Hoarders
  • Alchemy
Visit wiki for more info
Smoldering Pearl 1x
Smoldering Pearl
Smoldering Pearl

Smoldering Pearl

Character Level-Up Materials

How to obtain?

  • Dropped by Lv.30+ Pyro Hypostases
Visit wiki for more info
-
8 → 9 450,000
Philosophies of Transience 12x
Philosophies of Transience

Philosophies of Transience

Character Talent Materials

How to obtain?

  • Violet Court(Monday/Thursday/Sunday)
  • Crafting
Visit wiki for more info
Golden Raven Insignia 9x
Golden Raven Insignia

Golden Raven Insignia

Character and Weapon Enhancement Materials

How to obtain?

  • Dropped by Lv. 60+ Treasure Hoarders
  • Alchemy
Visit wiki for more info
Smoldering Pearl 2x
Smoldering Pearl
Smoldering Pearl

Smoldering Pearl

Character Level-Up Materials

How to obtain?

  • Dropped by Lv.30+ Pyro Hypostases
Visit wiki for more info
-
9 → 10 700,000
Philosophies of Transience 16x
Philosophies of Transience

Philosophies of Transience

Character Talent Materials

How to obtain?

  • Violet Court(Monday/Thursday/Sunday)
  • Crafting
Visit wiki for more info
Golden Raven Insignia 12x
Golden Raven Insignia

Golden Raven Insignia

Character and Weapon Enhancement Materials

How to obtain?

  • Dropped by Lv. 60+ Treasure Hoarders
  • Alchemy
Visit wiki for more info
Smoldering Pearl 2x
Smoldering Pearl
Smoldering Pearl

Smoldering Pearl

Character Level-Up Materials

How to obtain?

  • Dropped by Lv.30+ Pyro Hypostases
Visit wiki for more info
Crown of Insight 1x
Crown of Insight
Crown of Insight

Crown of Insight

Character Talent Materials

How to obtain?

  • Events
  • Offering Systems
  • Paimon's Bargains
Visit wiki for more info

Video icon Videos

Talents icon Talents

Talent level up priority:

  1. Genshin character elemental skill - Thoma Elemental Skill
  2. Genshin character elemental skill - Thoma Elemental Burst
  3. Polearm Normal Attack

Talent level up priority:

  1. Genshin character elemental skill - Thoma Elemental Burst
  2. Genshin character elemental skill - Thoma Elemental Skill
  3. Polearm Normal Attack

  • Polearm

    Normal Attack

    Swiftshatter Spear

    Normal Attack
    Performs up to 4 consecutive spear strikes.

    Charged Attack
    Consumes a certain amount of Stamina to lunge forward, dealing damage to opponents along the way.

    Plunging Attack
    Plunges from mid-air to strike the ground below, damaging opponents along the path and dealing AoE DMG upon impact.

    1-Hit DMG (%) 44.39
    2-Hit DMG (%) 43.63
    3-Hit DMG (%) 26.79×2
    4-Hit DMG (%) 67.36
    Charged Attack DMG (%) 112.75
    Charged Attack Stamina Cost 25
    Plunge DMG (%) 63.93
    Low Plunge DMG (%) 127.84
    High Plunge DMG (%) 159.68
    1-Hit DMG (%) 48.01
    2-Hit DMG (%) 47.18
    3-Hit DMG (%) 28.97×2
    4-Hit DMG (%) 72.84
    Charged Attack DMG (%) 121.92
    Charged Attack Stamina Cost 25
    Plunge DMG (%) 69.14
    Low Plunge DMG (%) 138.24
    High Plunge DMG (%) 172.67
    1-Hit DMG (%) 51.62
    2-Hit DMG (%) 50.73
    3-Hit DMG (%) 31.15×2
    4-Hit DMG (%) 78.32
    Charged Attack DMG (%) 131.1
    Charged Attack Stamina Cost 25
    Plunge DMG (%) 74.34
    Low Plunge DMG (%) 148.65
    High Plunge DMG (%) 185.67
    1-Hit DMG (%) 56.78
    2-Hit DMG (%) 55.8
    3-Hit DMG (%) 34.27×2
    4-Hit DMG (%) 86.15
    Charged Attack DMG (%) 144.21
    Charged Attack Stamina Cost 25
    Plunge DMG (%) 81.77
    Low Plunge DMG (%) 163.51
    High Plunge DMG (%) 204.24
    1-Hit DMG (%) 60.4
    2-Hit DMG (%) 59.35
    3-Hit DMG (%) 36.45×2
    4-Hit DMG (%) 91.63
    Charged Attack DMG (%) 153.39
    Charged Attack Stamina Cost 25
    Plunge DMG (%) 86.98
    Low Plunge DMG (%) 173.92
    High Plunge DMG (%) 217.23
    1-Hit DMG (%) 64.53
    2-Hit DMG (%) 63.41
    3-Hit DMG (%) 38.94×2
    4-Hit DMG (%) 97.9
    Charged Attack DMG (%) 163.88
    Charged Attack Stamina Cost 25
    Plunge DMG (%) 92.92
    Low Plunge DMG (%) 185.81
    High Plunge DMG (%) 232.09
    1-Hit DMG (%) 70.2
    2-Hit DMG (%) 68.99
    3-Hit DMG (%) 42.36×2
    4-Hit DMG (%) 106.52
    Charged Attack DMG (%) 178.3
    Charged Attack Stamina Cost 25
    Plunge DMG (%) 101.1
    Low Plunge DMG (%) 202.16
    High Plunge DMG (%) 252.51
    1-Hit DMG (%) 75.88
    2-Hit DMG (%) 74.57
    3-Hit DMG (%) 45.79×2
    4-Hit DMG (%) 115.13
    Charged Attack DMG (%) 192.72
    Charged Attack Stamina Cost 25
    Plunge DMG (%) 109.28
    Low Plunge DMG (%) 218.51
    High Plunge DMG (%) 272.93
    1-Hit DMG (%) 81.56
    2-Hit DMG (%) 80.15
    3-Hit DMG (%) 49.22×2
    4-Hit DMG (%) 123.75
    Charged Attack DMG (%) 207.14
    Charged Attack Stamina Cost 25
    Plunge DMG (%) 117.46
    Low Plunge DMG (%) 234.86
    High Plunge DMG (%) 293.36
    1-Hit DMG (%) 87.75
    2-Hit DMG (%) 86.24
    3-Hit DMG (%) 52.95×2
    4-Hit DMG (%) 133.14
    Charged Attack DMG (%) 222.87
    Charged Attack Stamina Cost 25
    Plunge DMG (%) 126.38
    Low Plunge DMG (%) 252.7
    High Plunge DMG (%) 315.64
    1-Hit DMG (%) 93.95
    2-Hit DMG (%) 92.33
    3-Hit DMG (%) 56.69×2
    4-Hit DMG (%) 142.54
    Charged Attack DMG (%) 238.6
    Charged Attack Stamina Cost 25
    Plunge DMG (%) 135.3
    Low Plunge DMG (%) 270.54
    High Plunge DMG (%) 337.92
  • Genshin character elemental skill - Thoma

    Elemental Skill

    Blazing Blessing

    Thoma vaults forward with his polearm and delivers a flame-filled flying kick that deals AoE Pyro DMG, while also summoning a defensive Blazing Barrier. At the moment of casting, Thoma’s Elemental Skill applies Pyro to himself.
    The DMG Absorption of the Blazing Barrier scales off Thoma’s Max HP.
    The Blazing Barrier has the following traits:

    • Absorbs Pyro DMG 250% more effectively.
    • When a new Blazing Barrier is obtained, the remaining DMG Absorption of an existing Blazing Barrier will stack and its duration will be refreshed.

    The maximum DMG Absorprtion of the Blazing Barrier will not exceed a certain percentage of Thoma’s Max HP.

    Skill DMG (%) 146.4
    Shield DMG Absorption 7.2% Max HP+693.3
    Shield Duration 8s
    Max Shield DMG Absorption 19.6% Max HP+1,887
    Skill CD 15s
    Skill DMG (%) 157.38
    Shield DMG Absorption 7.74% Max HP+762.6
    Shield Duration 8s
    Max Shield DMG Absorption 21.07% Max HP+2,076
    Skill CD 15s
    Skill DMG (%) 168.36
    Shield DMG Absorption 8.28% Max HP+837.7
    Shield Duration 8s
    Max Shield DMG Absorption 22.54% Max HP+2,280
    Skill CD 15s
    Skill DMG (%) 183
    Shield DMG Absorption 9% Max HP+918.7
    Shield Duration 8s
    Max Shield DMG Absorption 24.5% Max HP+2,500
    Skill CD 15s
    Skill DMG (%) 193.98
    Shield DMG Absorption 9.54% Max HP+1,005
    Shield Duration 8s
    Max Shield DMG Absorption 25.97% Max HP+2,736
    Skill CD 15s
    Skill DMG (%) 204.96
    Shield DMG Absorption 10.08% Max HP+1,097
    Shield Duration 8s
    Max Shield DMG Absorption 27.44% Max HP+2,988
    Skill CD 15s
    Skill DMG (%) 219.6
    Shield DMG Absorption 10.8% Max HP+1,196
    Shield Duration 8s
    Max Shield DMG Absorption 29.4% Max HP+3,255
    Skill CD 15s
    Skill DMG (%) 234.24
    Shield DMG Absorption 11.52% Max HP+1,300
    Shield Duration 8s
    Max Shield DMG Absorption 31.36% Max HP+3,539
    Skill CD 15s
    Skill DMG (%) 248.88
    Shield DMG Absorption 12.24% Max HP+1,409
    Shield Duration 8s
    Max Shield DMG Absorption 33.32% Max HP+3,838
    Skill CD 15s
    Skill DMG (%) 263.52
    Shield DMG Absorption 12.96% Max HP+1,525
    Shield Duration 8s
    Max Shield DMG Absorption 35.28% Max HP+4,152
    Skill CD 15s
    Skill DMG (%) 278.16
    Shield DMG Absorption 13.68% Max HP+1,646
    Shield Duration 8s
    Max Shield DMG Absorption 37.24% Max HP+4,482
    Skill CD 15s
    Skill DMG (%) 292.8
    Shield DMG Absorption 14.4% Max HP+1,773
    Shield Duration 8s
    Max Shield DMG Absorption 39.2% Max HP+4,829
    Skill CD 15s
    Skill DMG (%) 311.1
    Shield DMG Absorption 15.3% Max HP+1,906
    Shield Duration 8s
    Max Shield DMG Absorption 41.65% Max HP+5,190
    Skill CD 15s
    Skill DMG (%) 329
    Shield DMG Absorption 16.2% Max HP+2,046
    Shield Duration 8s
    Max Shield DMG Absorption 44.1% Max HP+5,568
    Skill CD 15s
  • Genshin character elemental skill - Thoma

    Elemental Burst

    Crimson Ooyoroi

    Thoma spins his polearm, slicing at his foes with roaring flames that deal AoE Pyro DMG and weave themselves into a Scorching Ooyoroi.

    Scorching Ooyoroi
    While Scorching Ooyoroi is in effect, the active character’s Normal Attacks will trigger Fiery Collapse, dealing AoE Pyro DMG and summoning a Blazing Barrier.
    Fiery Collapse can be triggered once every 1s.

    Except for the amount of DMG they can absorb, the Blazing Barriers created in this way are identical to those created by Thoma’s Elemental Skill, Blazing Blessing:

    • Absorbs Pyro DMG 250% more effectively.
    • When a new Blazing Barrier is obtained, the remaining DMG Absorption of an existing Blazing Barrier will stack and its duration will be refreshed.

    The maximum DMG Absorption of the Blazing Barrier will not exceed a certain percentage of Thoma’s Max HP.

    If Thoma falls, the effects of Scorching Ooyoroi will be cleared.

    Skill DMG (%) 88
    Fiery Collapse DMG (%) 58
    Shield DMG Absorption 1.14% Max HP+110
    Shield Duration 8s
    Scorching Ooyoroi Duration 15s
    Skill CD 20s
    Energy Cost 80
    Skill DMG (%) 94.6
    Fiery Collapse DMG (%) 62.35
    Shield DMG Absorption 1.23% Max HP+121
    Shield Duration 8s
    Scorching Ooyoroi Duration 15s
    Skill CD 20s
    Energy Cost 80
    Skill DMG (%) 101.2
    Fiery Collapse DMG (%) 66.7
    Shield DMG Absorption 1.32% Max HP+132.9
    Shield Duration 8s
    Scorching Ooyoroi Duration 15s
    Skill CD 20s
    Energy Cost 80
    Skill DMG (%) 110
    Fiery Collapse DMG (%) 72.5
    Shield DMG Absorption 1.43% Max HP+145.8
    Shield Duration 8s
    Scorching Ooyoroi Duration 15s
    Skill CD 20s
    Energy Cost 80
    Skill DMG (%) 116.6
    Fiery Collapse DMG (%) 76.85
    Shield DMG Absorption 1.52% Max HP+159.5
    Shield Duration 8s
    Scorching Ooyoroi Duration 15s
    Skill CD 20s
    Energy Cost 80
    Skill DMG (%) 123.2
    Fiery Collapse DMG (%) 81.2
    Shield DMG Absorption 1.6% Max HP+174.2
    Shield Duration 8s
    Scorching Ooyoroi Duration 15s
    Skill CD 20s
    Energy Cost 80
    Skill DMG (%) 132
    Fiery Collapse DMG (%) 87
    Shield DMG Absorption 1.72% Max HP+189.8
    Shield Duration 8s
    Scorching Ooyoroi Duration 15s
    Skill CD 20s
    Energy Cost 80
    Skill DMG (%) 140.8
    Fiery Collapse DMG (%) 92.8
    Shield DMG Absorption 1.83% Max HP+206.3
    Shield Duration 8s
    Scorching Ooyoroi Duration 15s
    Skill CD 20s
    Energy Cost 80
    Skill DMG (%) 149.6
    Fiery Collapse DMG (%) 98.6
    Shield DMG Absorption 1.94% Max HP+223.7
    Shield Duration 8s
    Scorching Ooyoroi Duration 15s
    Skill CD 20s
    Energy Cost 80
    Skill DMG (%) 158.4
    Fiery Collapse DMG (%) 104.4
    Shield DMG Absorption 2.06% Max HP+242
    Shield Duration 8s
    Scorching Ooyoroi Duration 15s
    Skill CD 20s
    Energy Cost 80
    Skill DMG (%) 167.2
    Fiery Collapse DMG (%) 110.2
    Shield DMG Absorption 2.17% Max HP+261.3
    Shield Duration 8s
    Scorching Ooyoroi Duration 15s
    Skill CD 20s
    Energy Cost 80
    Skill DMG (%) 176
    Fiery Collapse DMG (%) 116
    Shield DMG Absorption 2.29% Max HP+281.5
    Shield Duration 8s
    Scorching Ooyoroi Duration 15s
    Skill CD 20s
    Energy Cost 80
    Skill DMG (%) 187
    Fiery Collapse DMG (%) 123.25
    Shield DMG Absorption 2.43% Max HP+302.6
    Shield Duration 8s
    Scorching Ooyoroi Duration 15s
    Skill CD 20s
    Energy Cost 80
    Skill DMG (%) 198
    Fiery Collapse DMG (%) 131
    Shield DMG Absorption 2.6% Max HP+325
    Shield Duration 8s
    Scorching Ooyoroi Duration 15s
    Skill CD 20s
    Energy Cost 80

  • Genshin character 1st Ascension Passive - Thoma

    1st Ascension Passive

    Imbricated Armor

    When your current active character obtains or refreshes a Blazing Barrier, this character’s Shield Strength will increase by 5% for 6s.
    This effect can be triggered once every 0.3 seconds. Max 5 stacks.

  • Genshin character 4th Ascension Passive - Thoma

    4th Ascension Passive

    Flaming Assault

    DMG dealt by Crimson Ooyoroi’s Fiery Collapse is increased by 2.2% of Thoma’s Max HP.

  • Genshin character Utility Passive - Thoma

    Utility Passive

    Snap and Swing

    When you fish successfully in Inazuma, Thoma’s help grants a 20% chance of scoring a double catch.

Constellation icon Constellations

  • Genshin character constellation 1 - Thoma

    Constellation lvl 1

    A Comrade's Duty

    When a character protected by Thoma’s own Blazing Barrier (Thoma excluded) is attacked, Thoma’s own Blazing Blessing CD is decreased by 3s, while his own Crimson Ooyoroi’s CD is decreased by 3s.
    This effect can be triggered once every 20s.

  • Genshin character constellation 2 - Thoma

    Constellation lvl 2

    A Subordinate's Skills

    Crimson Ooyoroi’s duration is increased by 3s.

  • Genshin character constellation 3 - Thoma

    Constellation lvl 3

    Fortified Resolve

    Increases the Level of Blazing Blessing by 3.
    Maximum upgrade level is 15.

  • Genshin character constellation 4 - Thoma

    Constellation lvl 4

    Long-Term Planning

    After using Crimson Ooyoroi, 15 Energy will be restored to Thoma.

  • Genshin character constellation 5 - Thoma

    Constellation lvl 5

    Raging Wildfire

    Increases the Level of Crimson Ooyoroi by 3.
    Maximum upgrade level is 15.

  • Genshin character constellation 6 - Thoma

    Constellation lvl 6

    Burning Heart

    When a Blazing Barrier is obtained or refreshed, the DMG dealt by all party members’ Normal, Charged, and Plunging Attacks is increased by 15% for 6s.